Overview of Agent Management
Agent management is an essential feature for customer service and support platforms, allowing administrators to oversee the agents who interact with customers. This includes creating new agents, assigning permissions, and managing their roles and responsibilities. Effective agent management ensures customer queries are handled efficiently and that agents have the necessary tools and permissions to perform their tasks.
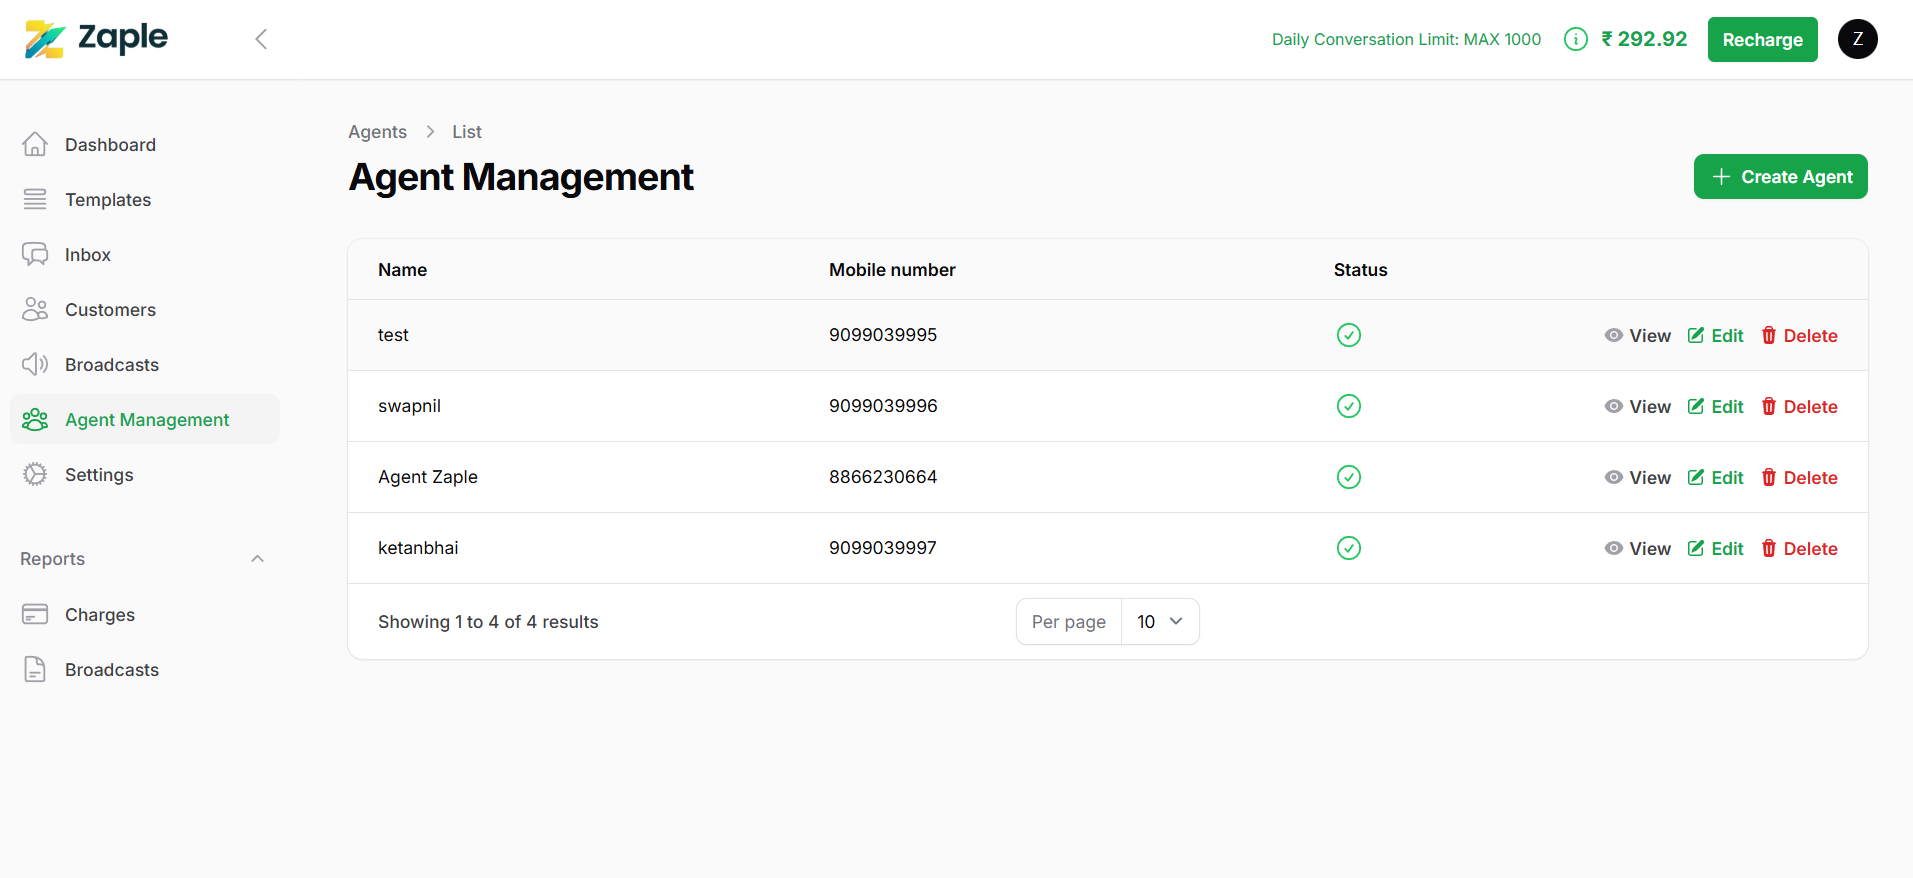
How to Create a New Agent: Step-by-Step Guide
1. Navigate to Agent Management
– Start by logging into the dashboard.
– From the left-hand menu, locate and select “Agent Management”. This will take you to the section where you can manage existing agents or add new ones.
2. Create a New Agent
– In the Agent Management section, click on the “Create Agent” button. This action will open the agent creation form, where you can input all the necessary details for the new agent.
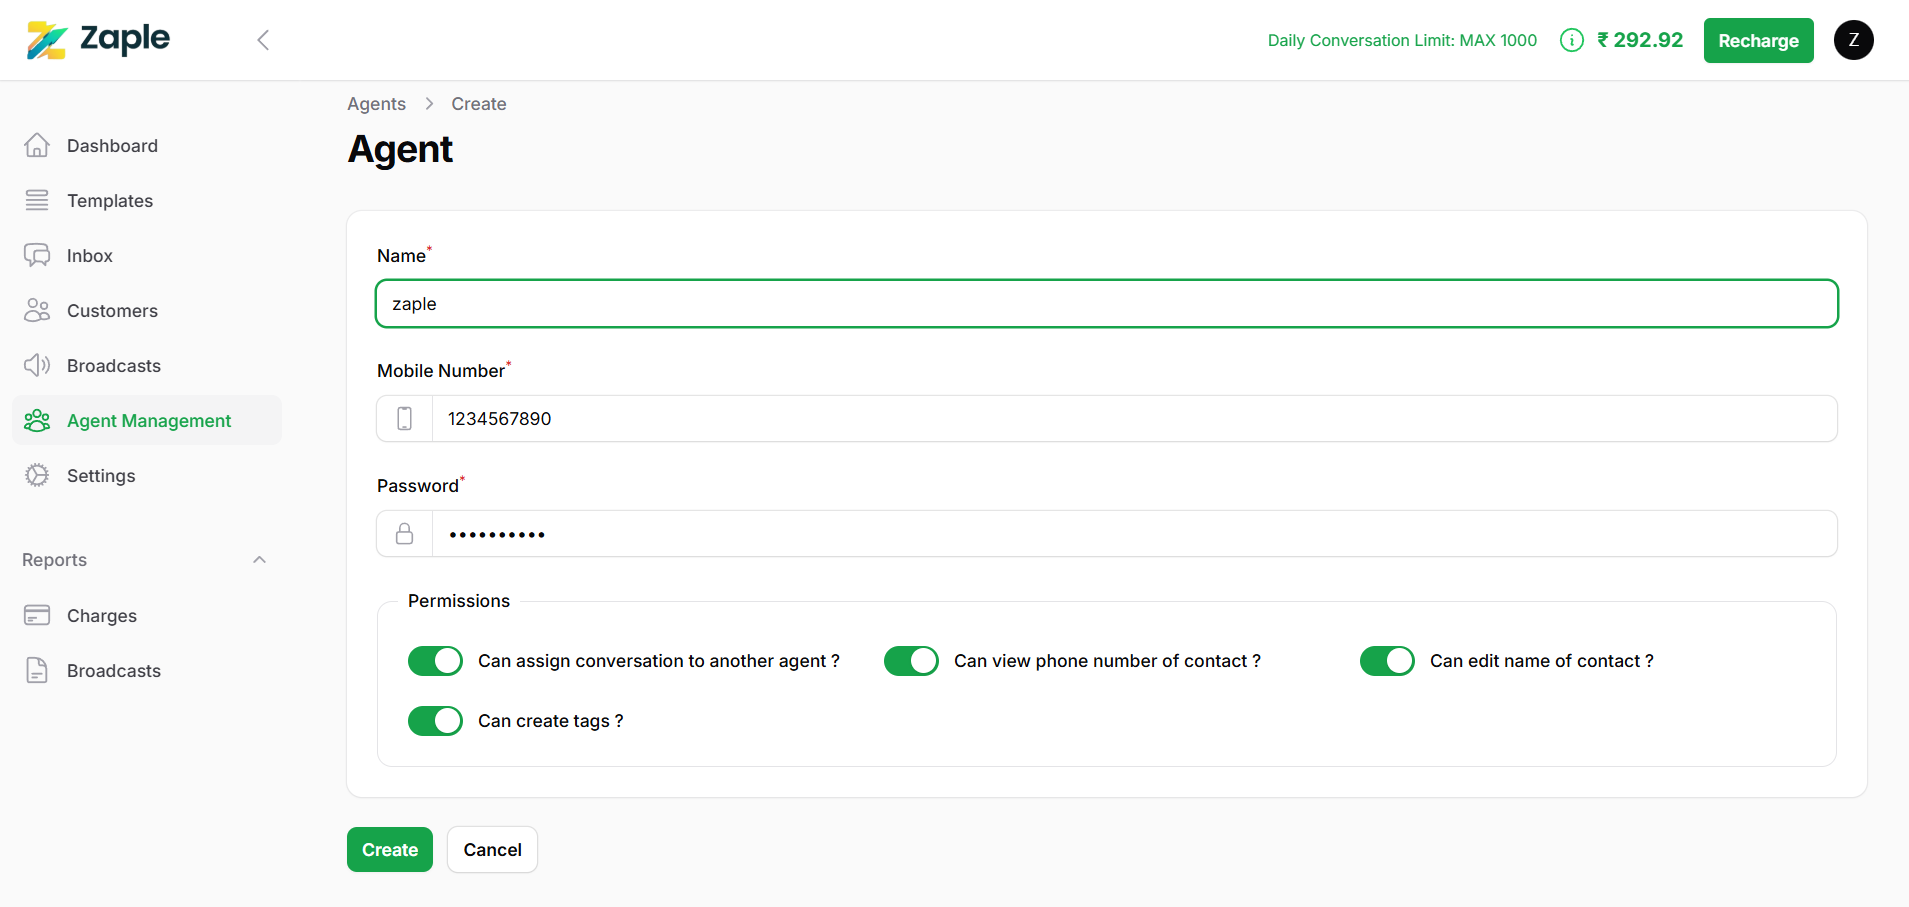
3. Fill in Agent Details
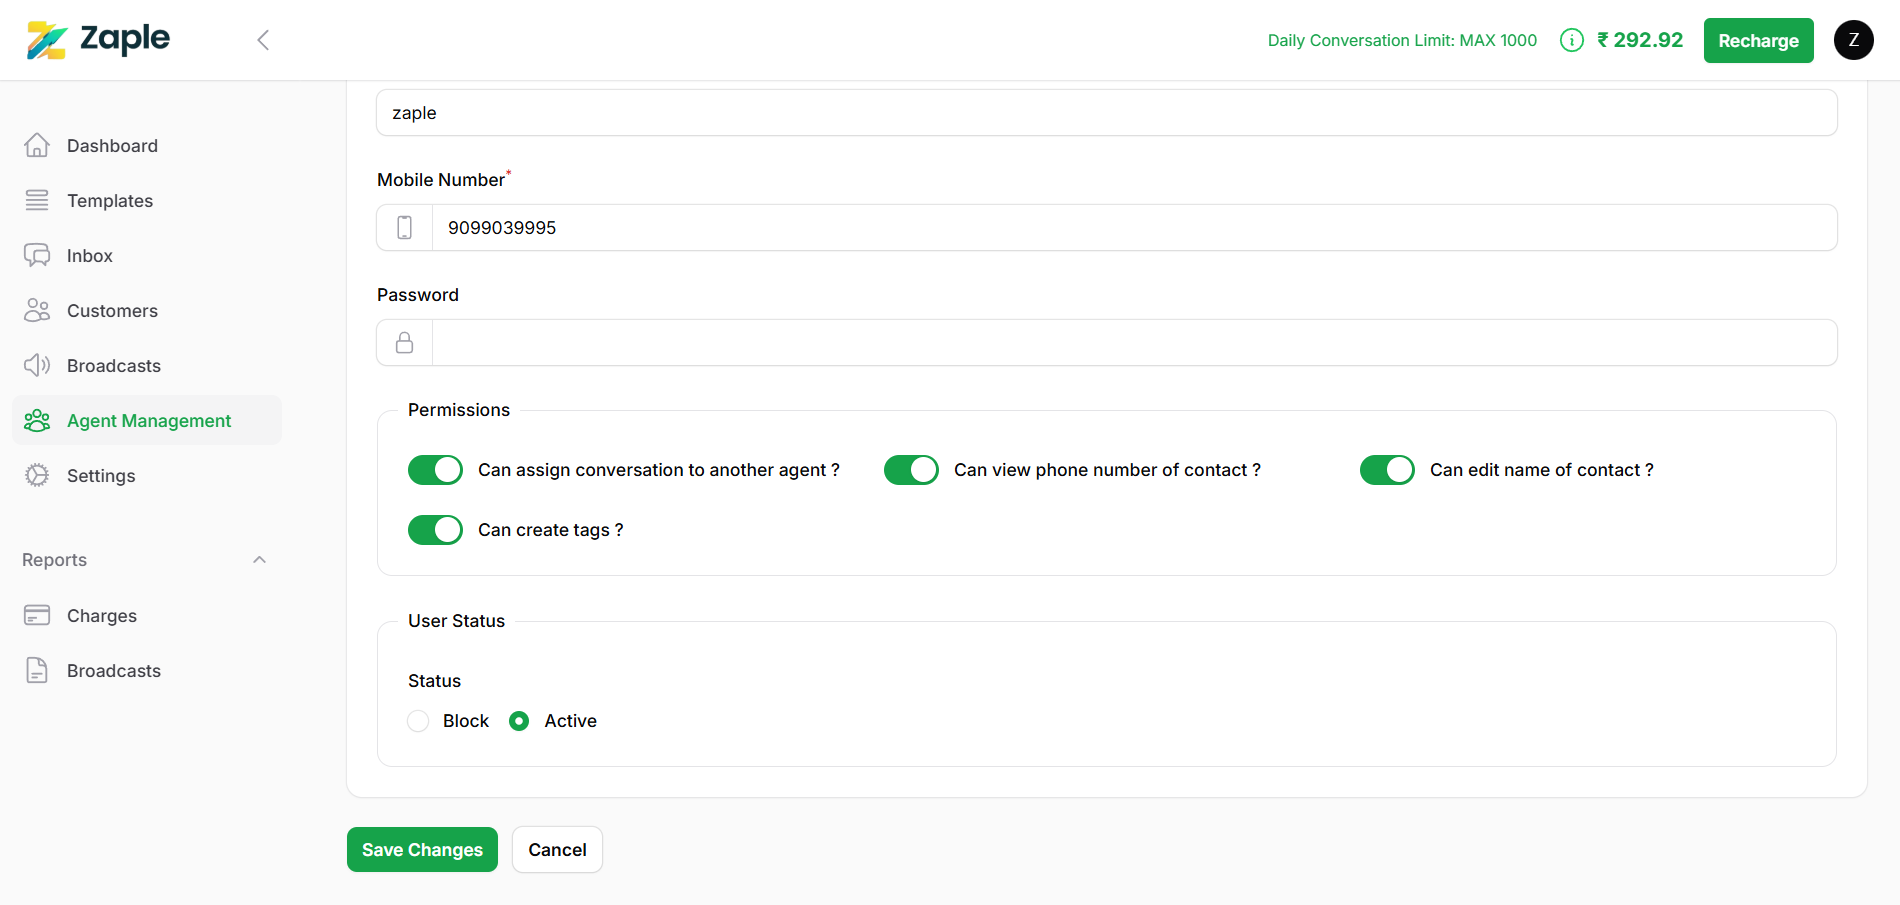
– Name: Provide the full name of the agent. This name will be used to identify the agent within the system.
– Mobile Number: Enter the agent’s mobile number. Ensure the number is correct, as it might be used for communication or authentication purposes.
– Password: Set a secure password for the agent’s account. Make sure the password meets any security requirements, such as length or complexity.
4. Set Permissions
Assign the appropriate permissions to the agent by toggling the switches provided on the form. These permissions control the actions the agent is allowed to perform, including:
– Can assign conversation to another agent?
Enable this if the agent should have the ability to reassign conversations to other agents.
– Can create tags?
Allow the agent to create custom tags for better organization and management of conversations.
– Can view the phone number of the contact?
Grant this permission if the agent needs access to contact phone numbers.
– Can edit the name of the contact?
Permit the agent to modify the names of contacts within the system.
5. Save the Agent
– Once all the required fields are filled out and the appropriate permissions are assigned, click the “Create” button to save the new agent.
– After saving, the new agent will be added to the system and will appear in the Agent Management list, ready to be assigned tasks or responsibilities.
Managing Existing Agents
Managing agents in a customer service platform is essential for efficient operations and excellent customer experiences. It involves assigning roles, monitoring performance, and providing the necessary tools and permissions to handle tasks effectively. Clear workflows, collaboration, and controlled access to sensitive data ensure agents can resolve issues efficiently, improving response times and customer satisfaction while supporting continuous improvement.
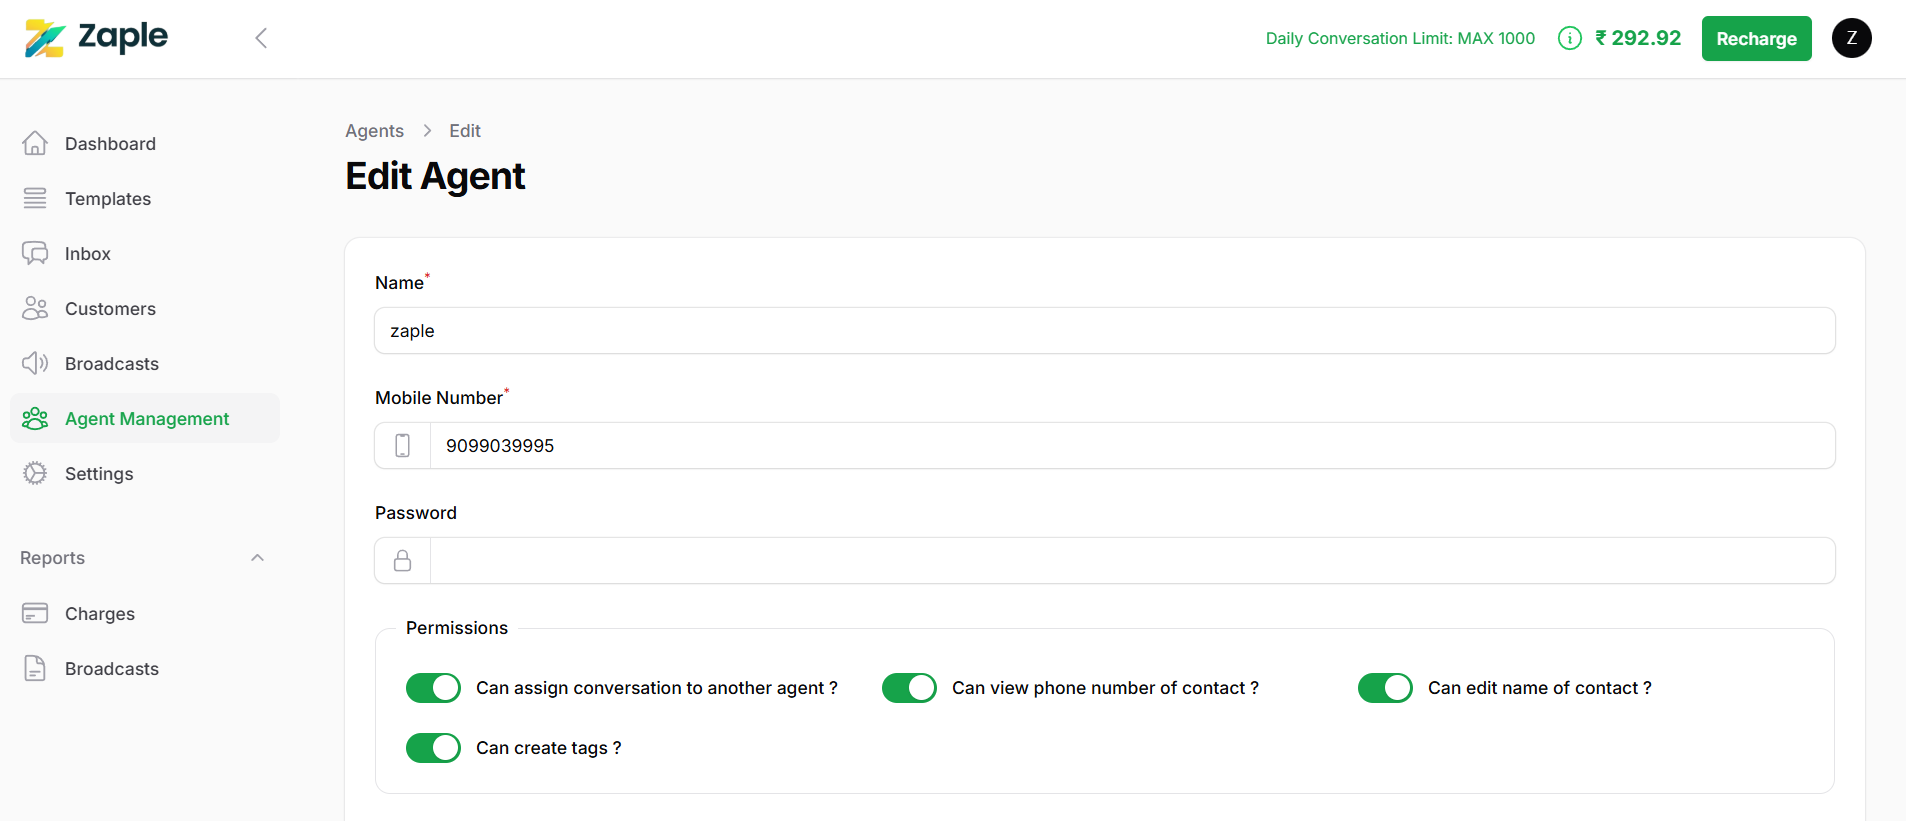
Editing an Agent
To update an agent’s information or permissions:
1. Locate the agent in the Agent Management section.
2. Click the “Edit” button next to the agent’s name.
3. A form will appear, allowing you to modify the agent’s details, such as name, contact information, or assigned permissions.
4. After making the necessary changes, click the “Save Changes” button to apply the updates. The system will update the agent’s profile with the new details.
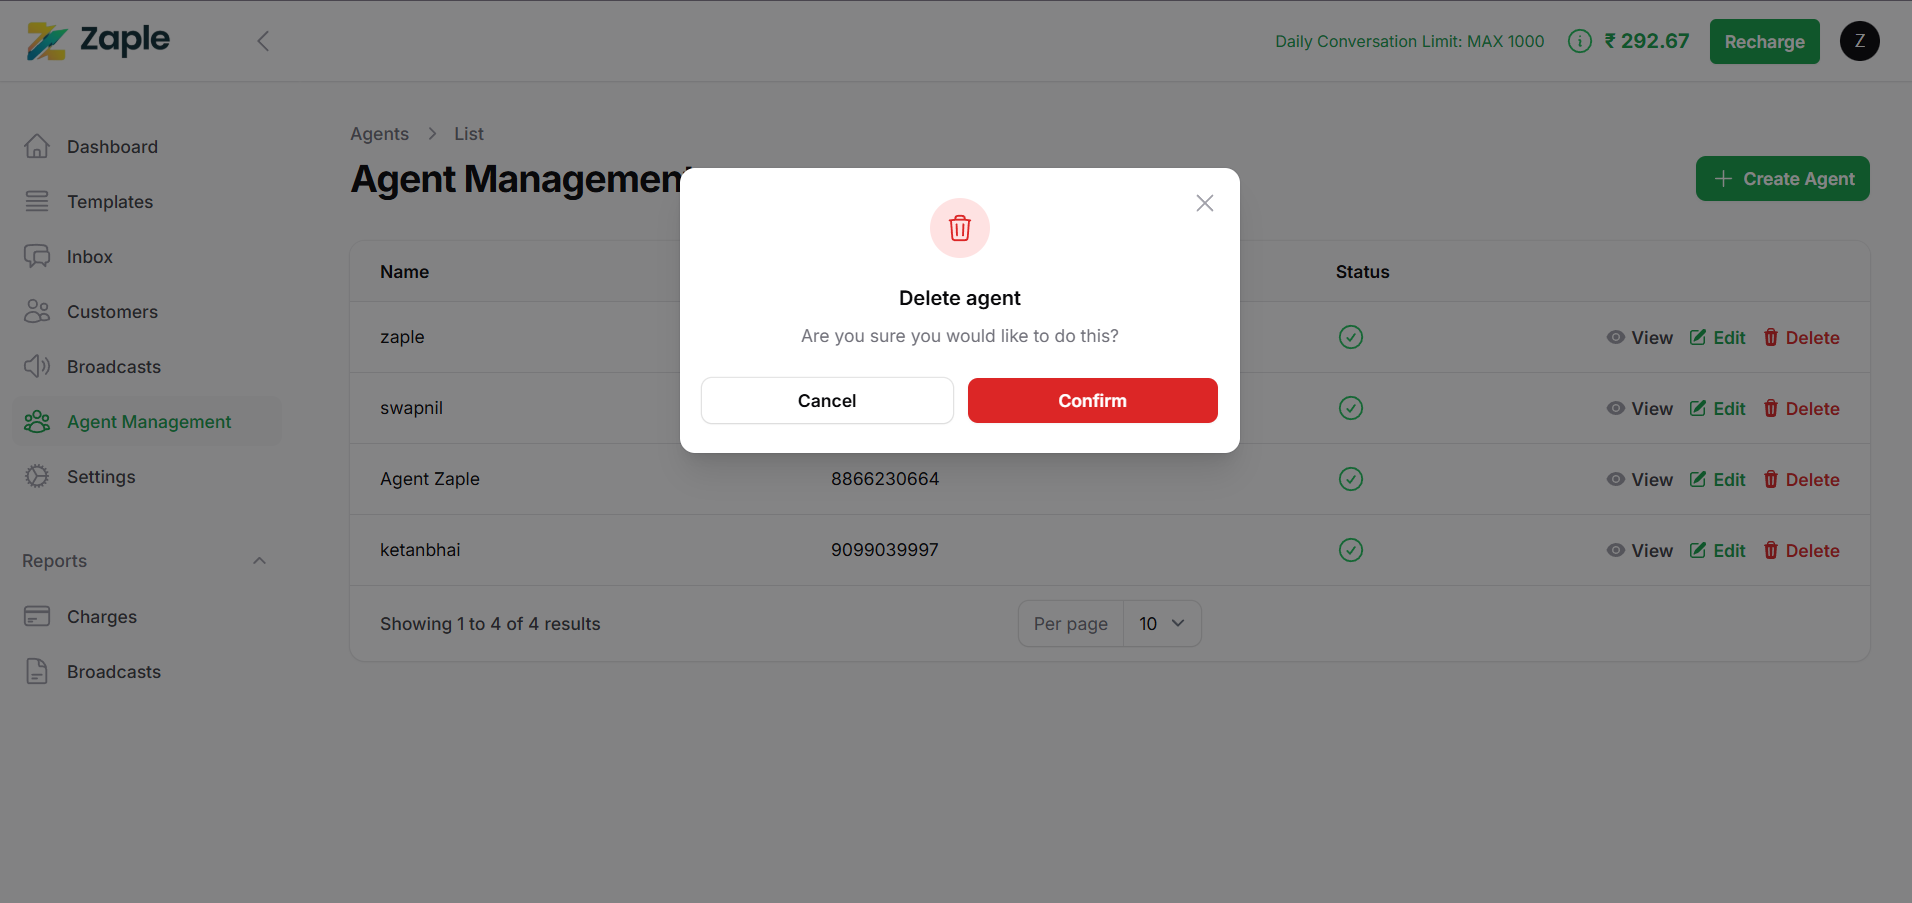
Deleting an Agent
To remove an agent permanently:
1. Find the agent in the list within the Agent Management section.
2. Click the “Delete” button next to the agent’s name.
3. A confirmation prompt will appear to ensure you want to proceed with the deletion.
4. Confirm the action, and the agent will be removed from the system. Note that this action is irreversible, so ensure the decision is final before proceeding.
Setting User Status
You can control an agent’s access by adjusting their status:
1. Locate the status toggle or dropdown for the agent in the Agent Management section.
2. Select “Active” to enable the agent, allowing them to perform their assigned tasks and access the system.
3. Choose “Block” to restrict the agent’s access. This prevents them from logging in or performing any actions while keeping their profile in the system.
Saving Changes
After making updates to an agent’s details, permissions, or status:
– Click the “Save Changes” button at the bottom of the form to apply the updates.
– If you decide not to proceed with the changes, click the “Cancel” button to discard them and return to the previous screen.
By carefully managing agent details and statuses, you can ensure the team operates efficiently and securely.
How to Assign a Conversation to an Agent: A Step-by-Step Guide
Assigning a chat to the appropriate agent ensures timely and efficient customer support. Follow these detailed steps to assign a conversation in the Zaple interface:
1. Locate the Chat
– Go to the “Inbox” section on the left sidebar.
– Browse through the list of active chats to find the one you want to assign.
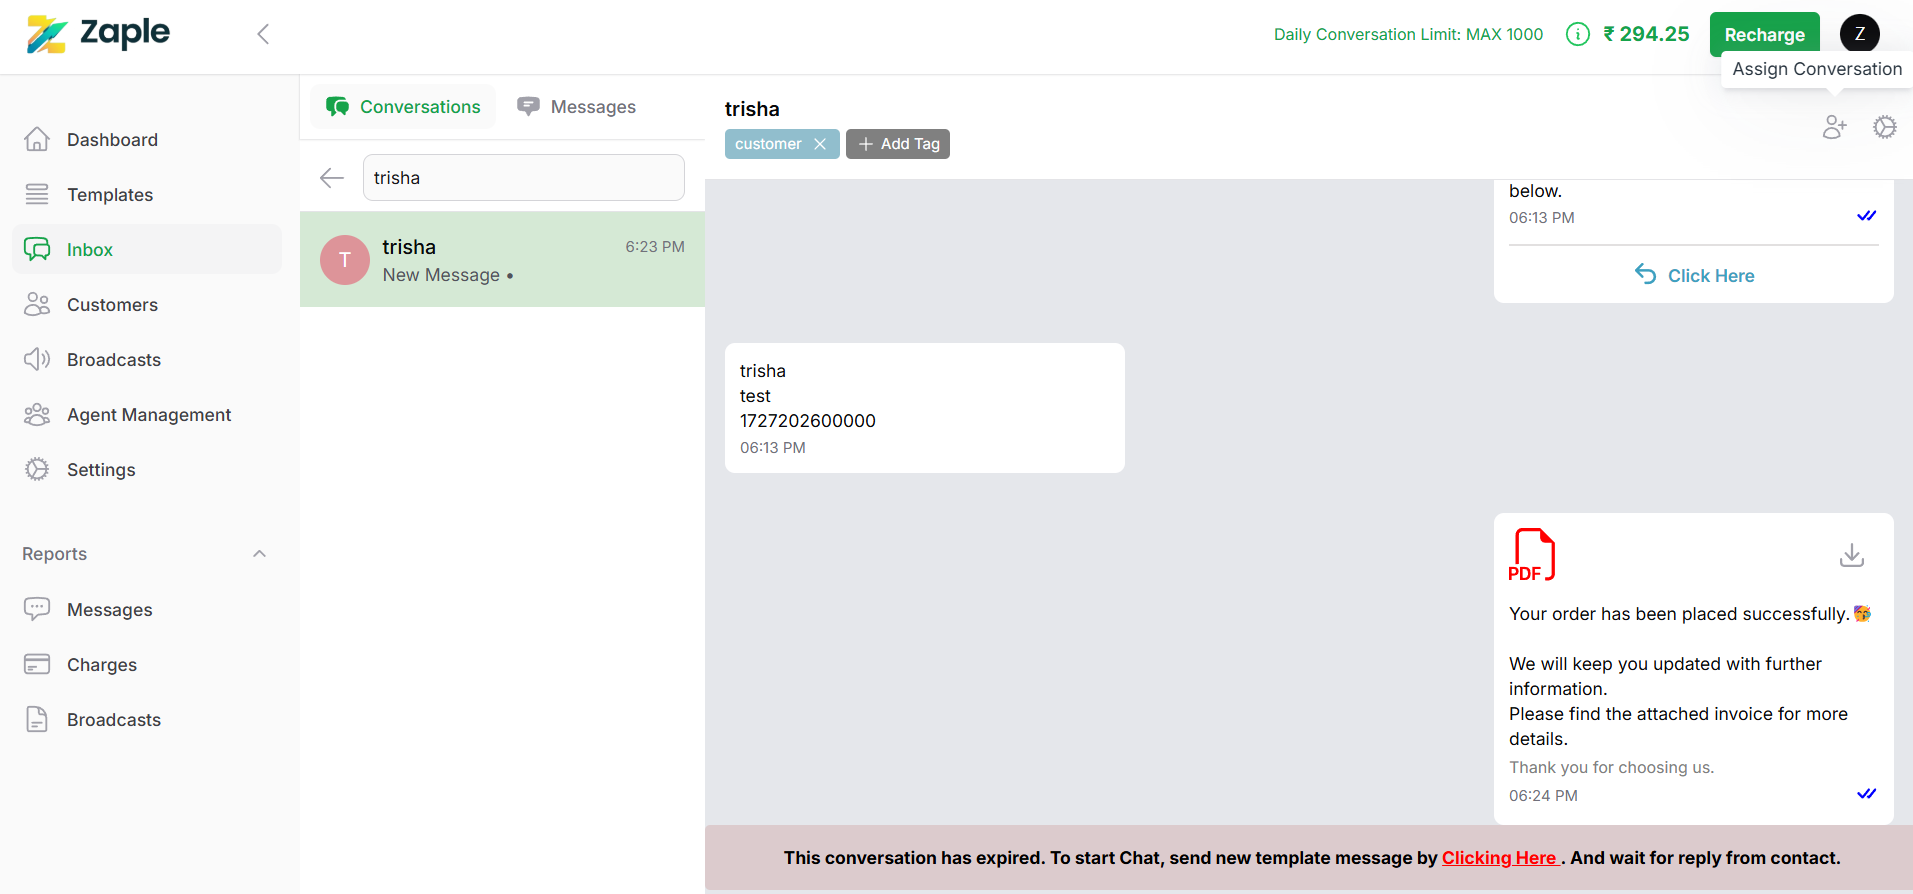
2. Click “Assign Conversation”
– Once the chat is selected, look for the “Assign Conversation” button in the top-right corner of the screen.
– Click on the button to initiate the process of assigning the chat.
3. Select an Agent
– A Popup will appear displaying a list of all available agents.
– Review the list and select the most appropriate agent based on their role, expertise, or current workload.
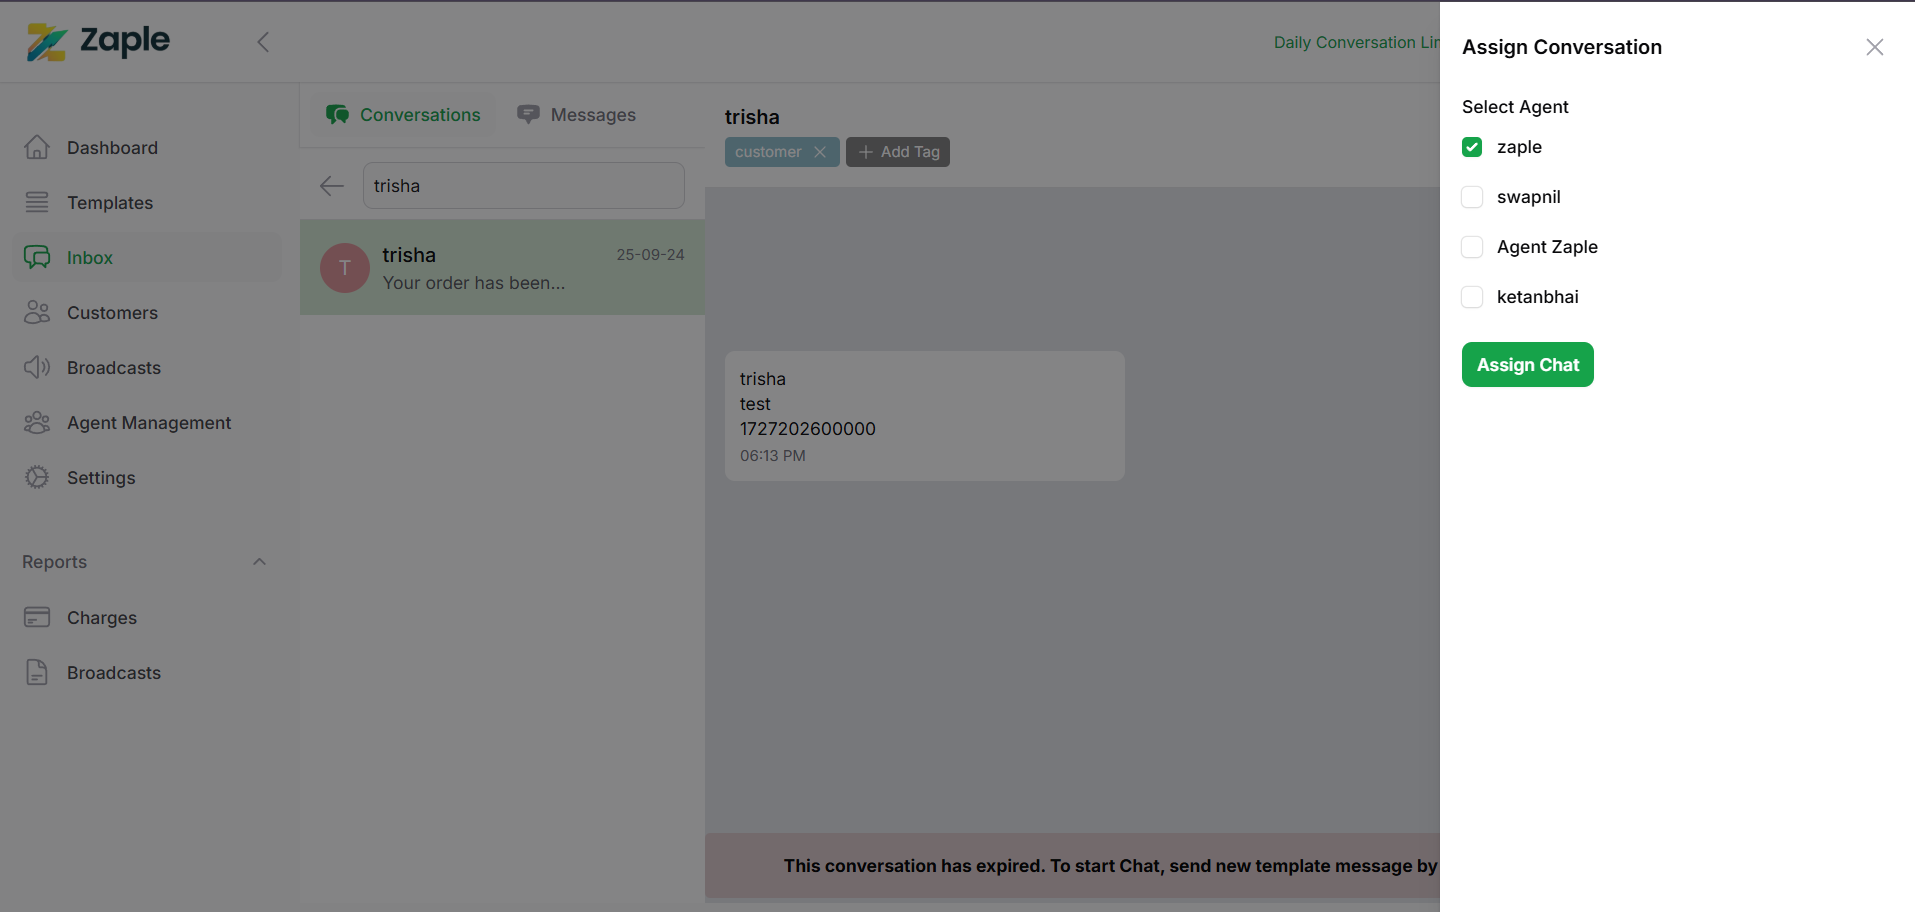
4. Confirm the Assignment
– After selecting the agent, click the “Assign Chat” button to confirm.
– The chat will now be redirected to the chosen agent, and they will be notified about the assignment.
Conversation Management for Agents
When agents are assigned conversations, these interactions will appear in the “Conversations” tab, where agents can directly access and manage them. This allows agents to stay on top of their tasks and provide timely support.
The functionality available to agents is determined by the permissions set within the system. Here’s how the permissions impact their ability to manage conversations:
With Permissions Enabled:
Agents have full control over their conversations, providing them with a comprehensive set of tools to streamline their workflow. These include:
-Assigning Conversations: Agents can reassign conversations to other team members, facilitating collaboration and ensuring that the right person handles each interaction based on their expertise or availability.
-Creating Tags: Agents can create custom tags to categorize conversations, helping them track and organize chats based on specific topics or issues. This makes it easier to follow up on particular cases and ensures that important information is easily retrievable.
-Viewing Phone Numbers: Agents can access the phone numbers associated with each conversation, which provides additional context, especially when follow-up calls or further communication are required.
-Editing Contact Names: Agents can update or correct contact names in conversations to ensure accuracy, especially in situations where the system may have auto-filled information or where customers’ names need to be clarified.
These capabilities help agents work more efficiently and effectively, ensuring smooth communication and optimal teamwork.
Without Permissions Enabled:
If permissions are not enabled, agents will have a more restricted set of tools. They will be unable to:
-Assign Conversations: Without this permission, agents cannot reassign conversations to other team members.
-Create Tags: Agents won’t be able to create custom tags to categorize conversations.
-Edit Contact Names: Without the ability to edit contact names.
-View Phone Numbers: Agents won’t have access to the phone numbers tied to conversations.
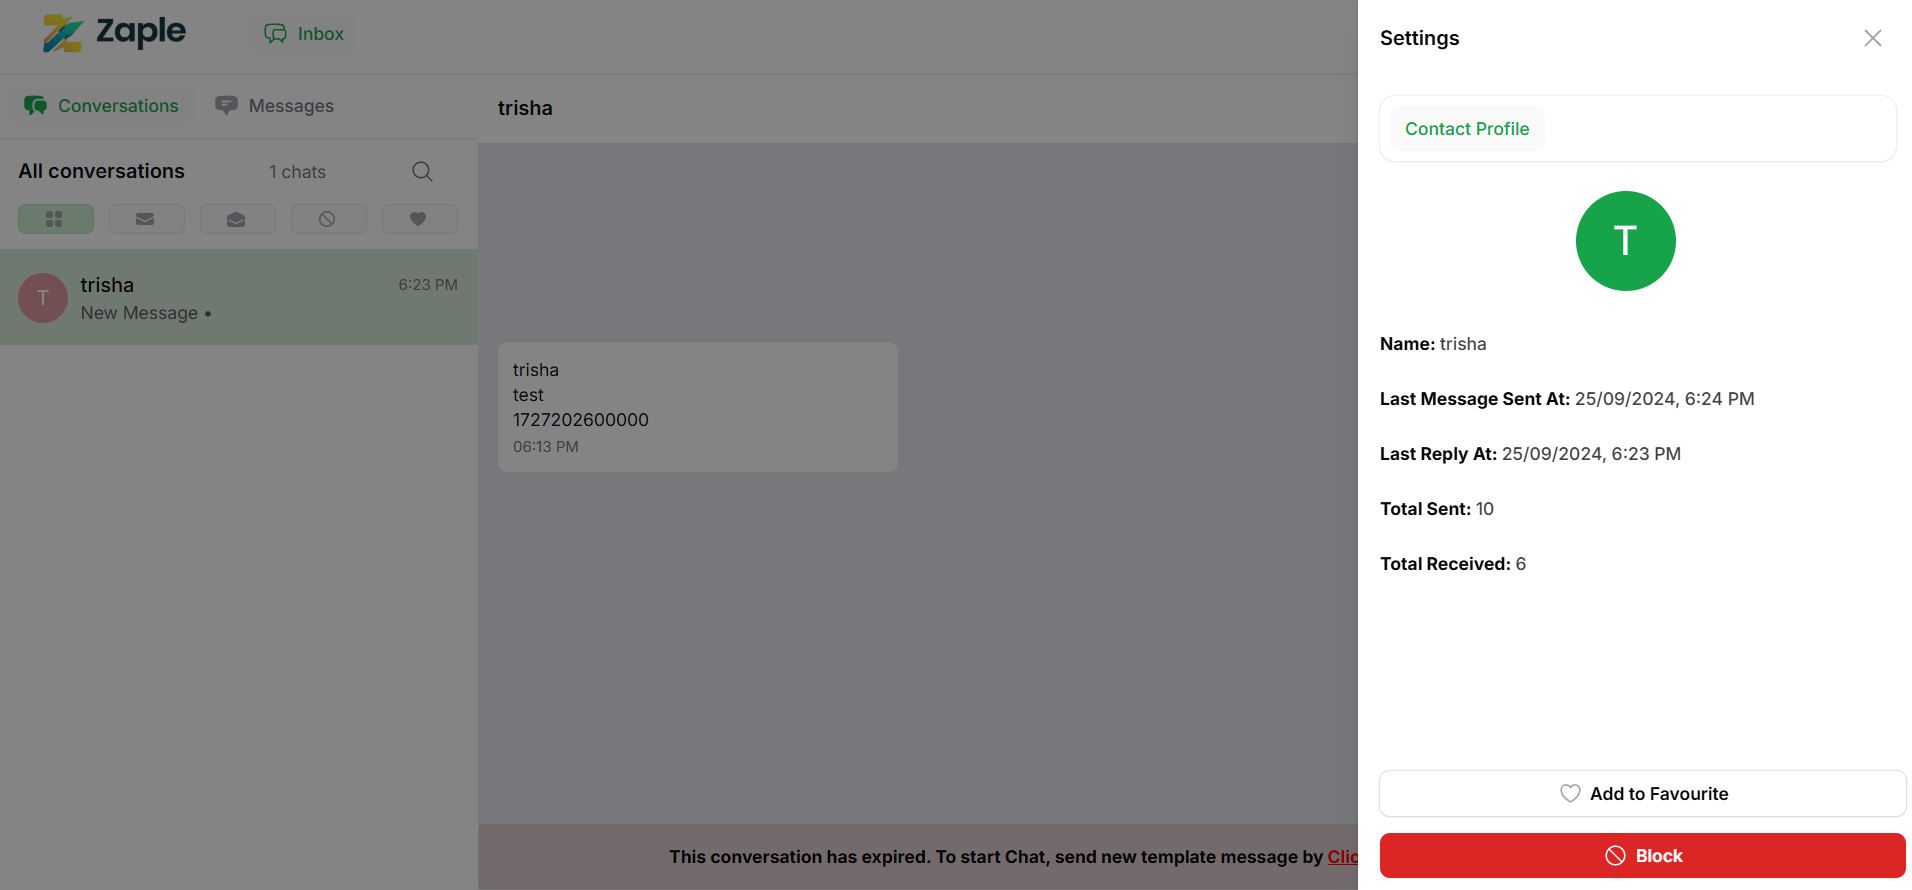
In this case, agents can still view and manage their assigned conversations within the “Conversations” tab but will need assistance from team leads or administrators for tasks requiring these restricted functionalities.
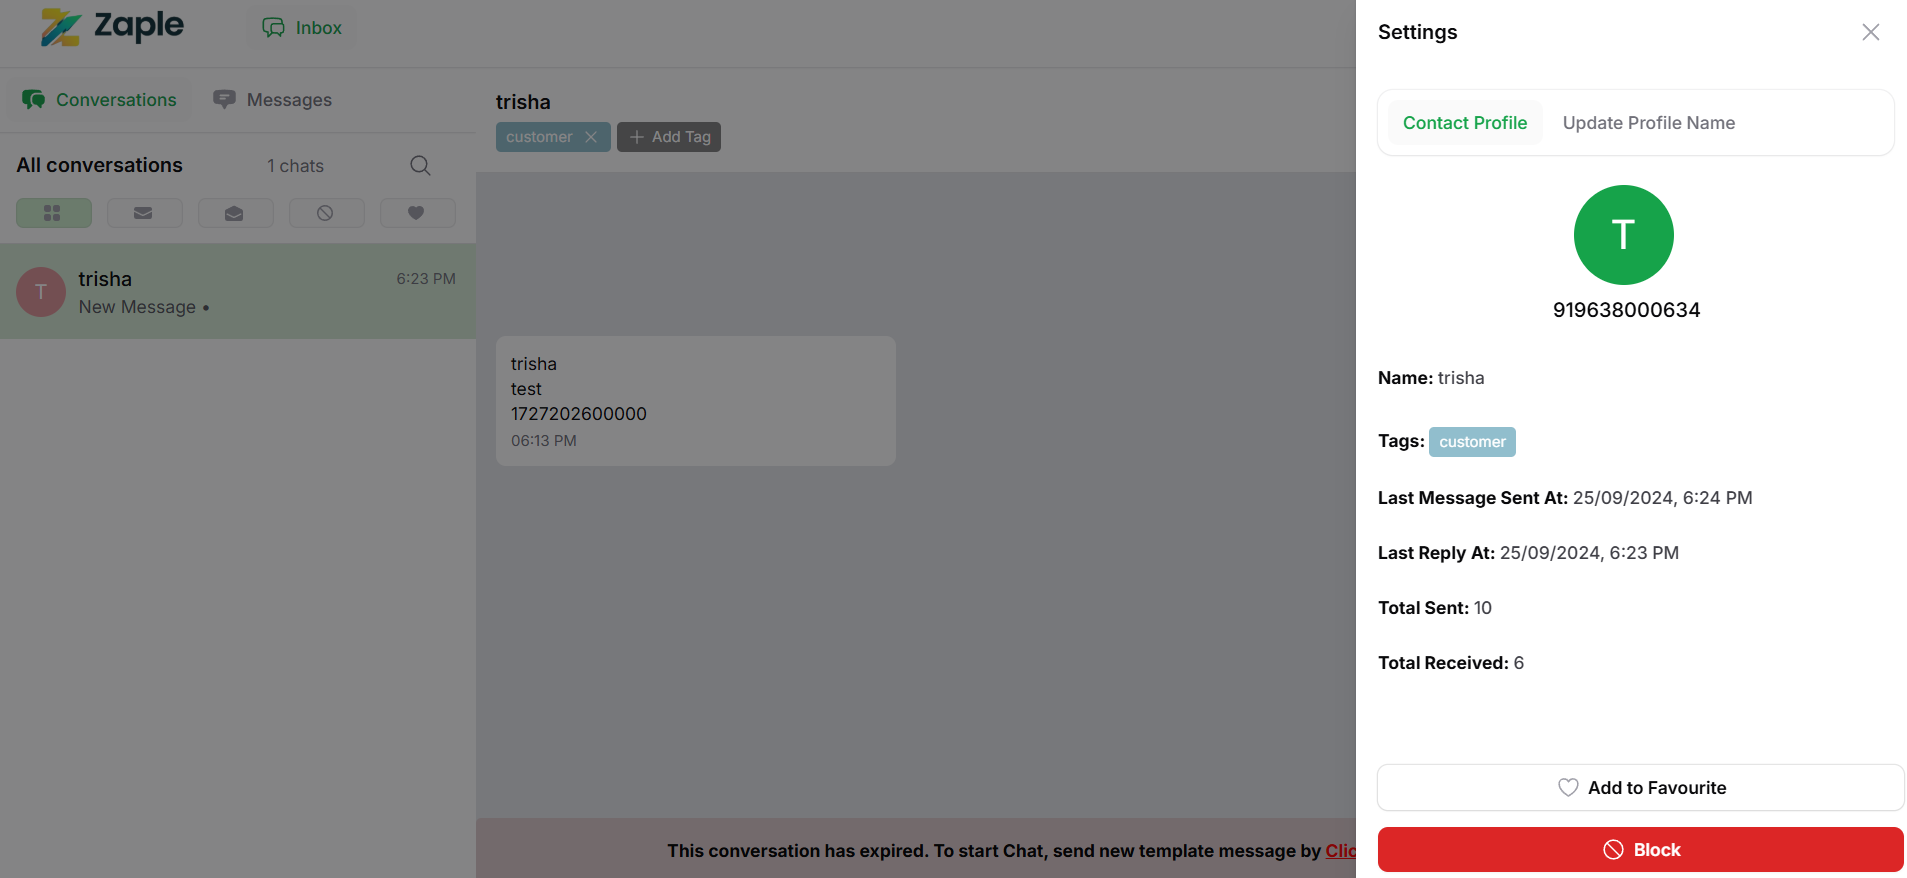
Agents have the ability to manage contacts by taking specific actions:
- Add to Favourites:
Agents can mark a contact as a favorite, making it easier to access and prioritize interactions with that contact. This feature is especially useful for managing frequent or high-priority communications. - Block Contact:
If necessary, agents can block a contact to prevent further messages or interactions. This can be used in situations such as spam prevention or handling inappropriate behavior. Blocking a contact ensures that the agent no longer receives notifications or messages from the blocked individual.
Both of these features—adding contacts to favorites and blocking contacts—give agents more control over their interactions, enabling them to maintain a focused and efficient communication process while reducing distractions or unnecessary communication.
Managing Agent Profile
Managing an agent profile is essential for ensuring a personalized, efficient, and secure experience in a customer support environment. The process involves updating personal details, managing login credentials, and ensuring that the account reflects current information. Below are the detailed steps for managing an agent’s profile:
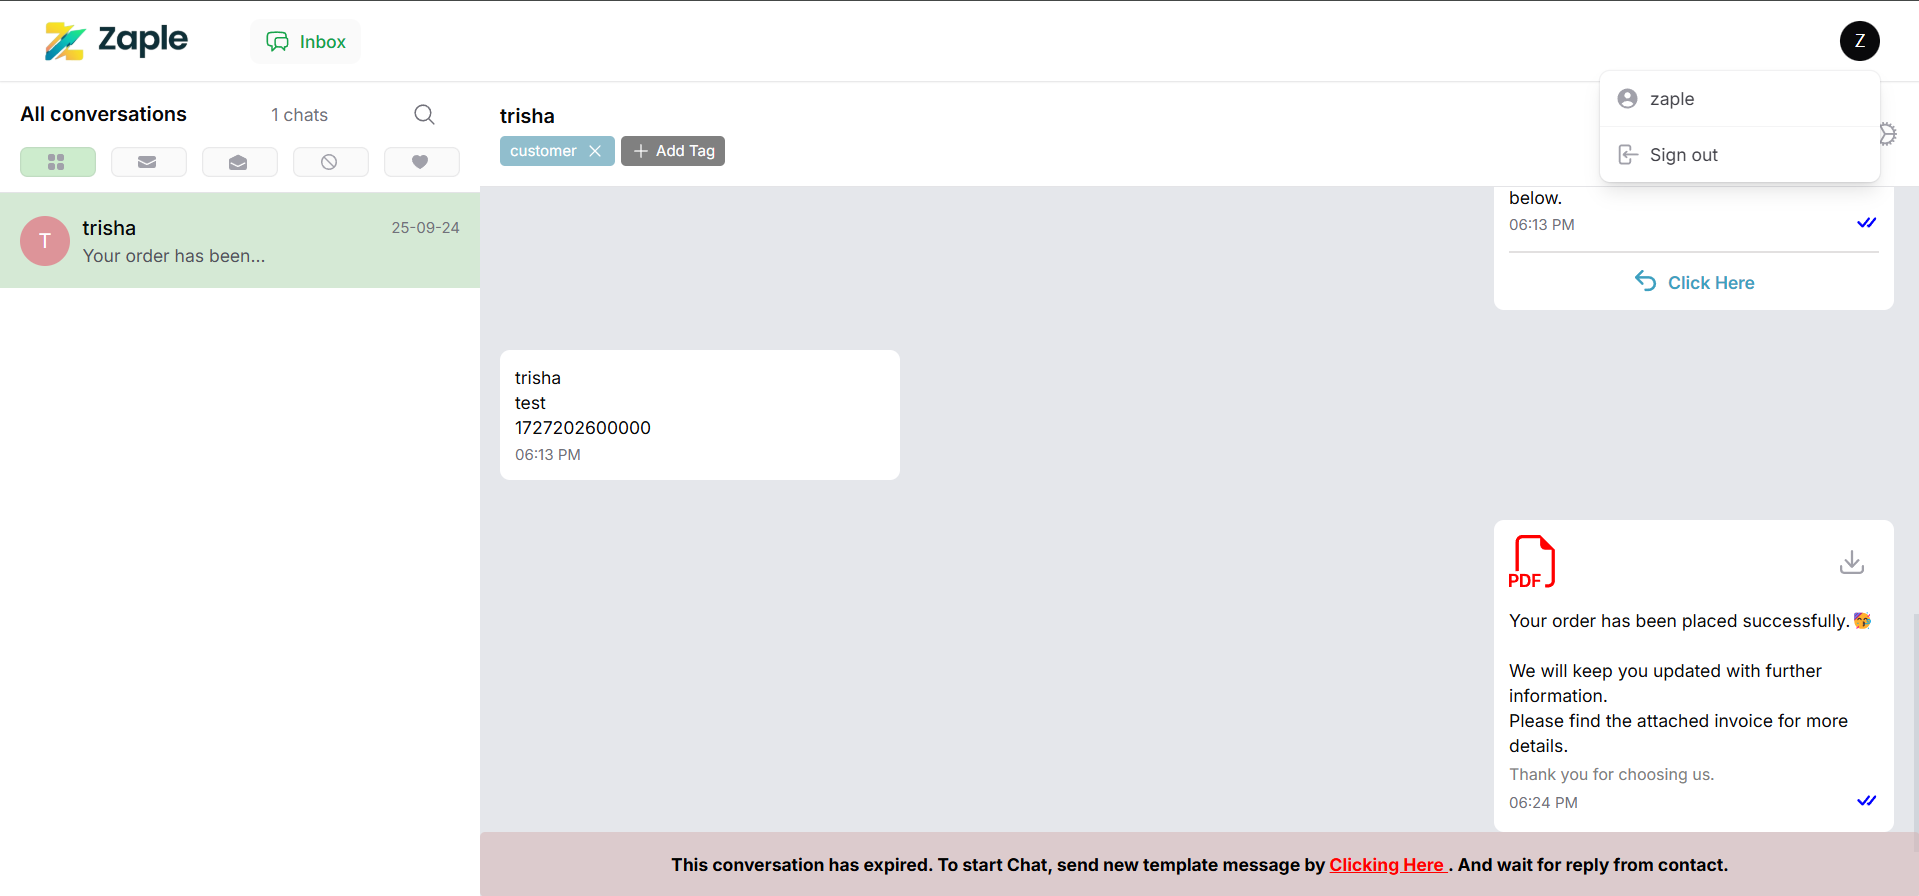
1. Access the Profile Menu
– To start managing your profile, locate the profile icon in the top-right corner of the interface.
– Click on the icon to open a menu that provides access to profile-related settings and options.
2. Open the Dropdown Menu
– Upon clicking the profile icon, a dropdown menu will appear with two primary options:
– The agent’s name (e.g., “Zaple”), which allows you to view or edit your profile details.
– “Sign Out”, which securely logs you out of your account.
– Select your name to proceed to the My Profile page, where you can manage personal information and other account settings.

Updating Personal Information
1. Navigate to the Personal Information Section
– On the My Profile page, find the section labeled “Personal Information”.
– This section contains fields for viewing and editing details such as your name and mobile number.
2. Edit Personal Information
– Locate the fields for “Name” and “Mobile Number”
– To change your name, click on the text box next to “Name” and type the desired name.
– To update your mobile number, click on the text box next to “Mobile Number” and enter the new number.
3. Save Changes
– Once you’ve updated the details, click the green “Submit” button located at the bottom-right corner of the Personal Information section.
– Your changes will be saved, and your profile will be updated accordingly.
Updating Your Password
1. Enter Current Password
– In the password settings section, locate the “Current Password” field.
– Enter your existing password to verify your identity before proceeding with changes.
2. Create a New Password
– Enter a new password in the “New Password” field.
– Make sure the password meets any security requirements, such as being at least 8 characters long.
3. Confirm New Password
– Re-enter the new password in the “Confirm Password” field.
– This ensures accuracy and prevents errors due to typos.
4. Submit Changes
– After filling in all the password fields correctly, click the green “Update” button at the bottom of the form.
– Your password will be updated, and the new credentials will take effect immediately.
By following these steps, agents can ensure that their profile information and login credentials are accurate, secure, and up to date, enabling them to work efficiently while maintaining account integrity.

